Share The Bliss
DIY Tinted Lip Balm: The Perfect Nourishing Formula with Natural Tints & Herbal Infusions
Share The Bliss
Hello Friends!
I started making my own tinted lip balm after noticing that some store-bought glosses were irritating my eyes and honestly, the cost of “natural” products didn’t always match what was actually inside them.
There’s something deeply satisfying about making your own lip balm. It’s simple, clean, and it actually works. No fillers, no mystery ingredients, just rich plant oils, natural waxes, and a soft tint that looks like your lips, only better.
This is a beginner-friendly, clean beauty–style formula inspired by traditional balm-making methods (slow melt, low heat, and nutrient-dense fats that actually support the skin barrier).
Also, I don’t use essential oils in lip balms because the skin on the lips is thin, sensitive, and easily irritated. Strong essential oils can feel too intense for daily use and may contribute to dryness over time. Lip balm also sits on the lips through sun, wind, and weather exposure, and some essential oils can become more irritating when paired with sun exposure. Instead, I prefer gentle oil infusions from herbs and flowers. They give soft scent and plant benefits without the harshness, keeping lips hydrated, calm, and comfortable for everyday use.
The Perfect Tinted Lip Balm Formula
Ingredients:
– 3 tbsp coconut oil (moisturizing + smooth glide)
– 1 tbsp castor oil (adds shine + natural plumping effect)
– 1.5 tbsp beeswax (structure + staying power)
– 1 tbsp shea butter (deep nourishment + softness)
– 1 tsp beetroot powder (natural tint)
– 1 tsp vitamin E oil (antioxidant + preservation support)
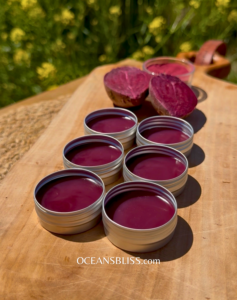
Yield (How Much This Makes)
This batch yields approximately:
5 to 7 standard lip balm tins (5 ml / 0.17 oz each)
OR
4 larger tins (10 ml / 0.34 oz each)
(Exact yield depends on how much air you whip in and how much settles in transfer.)
Method (Clean Beauty Balm Technique)
This follows the classic “double boiler melt method” used in herbal salve and balm making to preserve ingredient integrity.
Step 1: Prepare your tins
– Clean and fully dry tins or tubes (moisture can reduce shelf stability)
– Place them on a flat tray for easy pouring
Step 2: Melt the base
– Using a double boiler (or a heat-safe bowl over a pot of simmering water):
Add: beeswax, coconut oil, shea butter, castor oil
– Gently heat until fully melted. Stir occasionally to combine.
Important: Keep heat low and slow — you’re melting, not cooking.
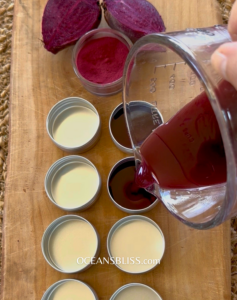
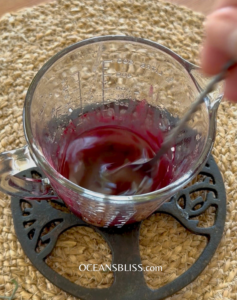
Step 3: Add colour + actives
Remove from heat.
Immediately mix in: beetroot powder (whisk well to avoid clumps) and vitamin E oil. For a smoother finish, you can strain through a fine mesh if needed, but a rustic natural speckle is normal with plant powders.
Step 4: Pour + set
– Carefully pour into tins while still warm and liquid
– Let sit undisturbed at room temperature for 2–3 hours
– Do not refrigerate (can cause grainy texture in butters)
Storage + Shelf Life
Store in a cool, dry place away from direct sunlight
Shelf life: approximately 6–12 months
Vitamin E helps slow oxidation, but freshness depends on environment and ingredient quality
How to Customize Your Own Lip Balm (Clean Beauty Style)
Once you understand the base formula — oil + butter + wax + active — you can start creating your own variations like a traditional herbalist or clean beauty formulator. It helps to understand this:
Wax = structure
Butters = nourishment
Oils = glide + absorption
Botanicals = function + scent + colour
Easy Clean Beauty Swaps (Build Your Own Lip Balm)
Once you understand the base structure: oil + butter + wax + active — you can start customizing textures, scent, and skin feel. These are only a few common options but they only represent a fraction of the potential ingredients and combinations!
Carrier Oil Swaps (Base Oils)
These replace coconut oil or castor oil depending on the finish you want:
Jojoba oil → lightweight, closest to skin’s natural sebum, very “non-greasy”
Sweet almond oil → soft, nourishing, slightly richer glide
Avocado oil → deeply conditioning, great for dry or winter lips
Olive squalene → ultra-light, silky, modern clean beauty feel
Argan oil → smooth, antioxidant-rich, slightly luxurious finish
Butter Swaps (Texture + Richness)
These replace shea butter or work in blends:
Mango butter → silky, non-greasy, very smooth finish (great for tinted balms)
Cocoa butter → firmer balm, subtle natural chocolate scent, more protective barrier
Kokum butter → firm, long-lasting, great for heat stability
Avocado butter → creamy, ultra-hydrating, melts beautifully on skin
Tip: blending two butters often gives the best texture (e.g., shea + mango).
Wax Options (Structure + Staying Power)
These adjust firmness and how long the balm stays on lips:
Beeswax (yellow or white) → classic, protective, slightly glossy finish
Candelilla wax (vegan) → harder set, more matte finish
Carnauba wax (vegan) → very firm, excellent in warm climates
Berry wax → soft vegan wax, smooth texture, slightly more natural glide
Functional Add-Ins (Actives + Finish)
Honey powder → light humectant feel (use very small amounts; too much can become sticky)
Vitamin E oil → antioxidant support, helps slow oxidation of oils
Rosehip oil → naturally rich in skin-supporting fatty acids, adds glow
Aloe vera powder (oil-dispersible only) → soothing feel for sensitive lips
Clay (tiny pinch, cosmetic grade) → can subtly mattify tinted balms
Botanical Infusion Options (Instead of Essential Oils)
For a more traditional herbal method:
Calendula petals → soothing, skin-calming
Chamomile flowers → gentle, anti-inflammatory feel
Rose petals → soft floral aroma + romantic tone
Lavender buds → calming, slightly herbal scent
Vanilla bean (infused oil) → warm, naturally sweet base
Infuse oils slowly over low heat or cold infuse for a few weeks for best results.
Simple Formulation Rule (Helpful for DIY Blending)
More oil = softer balm
More wax = firmer, longer wear
More butter = richer, creamier feel
Add-ins should always be kept low (they support, not dominate)
Simple Natural Tinting Options
If you want easy, beginner-friendly colour options for lip balm, these are the most reliable and simple to work with:
Beetroot powder → soft pink to rosy tint
Hibiscus powder → deeper pink / berry tone
Cocoa powder → warm nude-brown tint
Alkanet root (infused oil) → natural red-rose tint
Rosehip oil (with a little pigment) → soft warm blush tone
Herbal & Non-Tinted Summer Lip Balm Variations
Here are a couple of simple, nostalgic, summer-inspired blends to customize The Perfect Tinted Lip Balm Formula
1. Peppermint Garden Balm (Cooling + Fresh)
Use infused oil – make a carrier oil head of time with dried mint leaves and jojoba oil or sweet almond oil (strain before use)
Optional: tiny pinch of dried calendula powder for skin soothing
Feels like a cool breeze on warm skin.
2. Rose Petal Balm
Use infused oil – make a carrier oil ahead of time with dried rose petals and jojoba oil, sweet almond oil, or olive oil (strain before use)
3. Herbal “Garden Balm” (Unscented Skin Support)
Infuse coconut oil with dried chamomile or calendula ahead of time
Strain before using in recipe
This one is beautiful for sensitive lips or children.
With Bliss xo
DIY Disclaimer:
This content is shared for informational, inspirational and educational purposes only.Please use appropriate safety precautions and your own judgment when attempting any project. We are not liable for any injury, damage, or loss resulting from use of this information. This guide reflects the methods I personally use in my own home.


Featured Product
![]()
Handmade in Penticton,BC