
Share The Bliss
Wildcrafted Pine Resin Salve Recipe

Share The Bliss
Hello Beautiful Friends!
Walking mountain trails, you’ll often see golden resin pooled along a scar in the bark. That’s a trees band aid, its way of protecting and healing wounds.
Welcome back to Oceans Bliss Portal! Today let’s look at how trees release resin, it’s sticky, fragrant and golden, to seal the cut, keep bugs out, and protect themselves while they heal.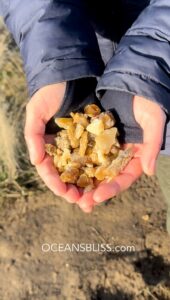
That same resin has been used for generations as a kind of forest bandage, valued for its protective and antimicrobial properties. When harvested respectfully (only what’s already fallen or oozed naturally), pine resin becomes a simple, effective ingredient for a wildcrafted salve, something useful to keep in a first-aid kit or hiking pack.
Making a Douglas fir (or pine/spruce) pitch resin salve is a traditional DIY remedy used for healing cuts, scrapes, drawing out splinters, and soothing dry, cracked skin. It acts as an antibacterial and antimicrobial, sealing wounds like a natural bandage.
Here is a guide to harvesting and making the salve.
1. Harvesting and Cleaning the Resin
Locate: Look for sticky, amber-coloured sap (pitch) or hardened, crystallized resin on the wounds of conifers like Douglas fir, pine, or spruce.
Harvest: Use an old knife to scrape the pitch into a dedicated container. Only take the excess resin, leaving enough to protect the tree.
Clean (Boiling Method):
Place the raw resin into a piece of cheesecloth or muslin along with a small stone to act as a weight.
Tie the bundle tightly with cotton string.
Place the bundle in a pot filled with water (use a dedicated “pitch pot” as it is very hard to clean).
Boil for 45–60 minutes. The resin will melt and seep out of the cloth, leaving behind bark and debris.
Allow to cool. The purified resin will solidify and separate from the water.
2. DIY Douglas Fir Pitch Salve Recipe
This recipe produces a firm, healing balm.
1/4 cup Cleaned/Strained Douglas Fir Resin
1/2 cup Olive Oil (or Almond/Jojoba Oil)
1 oz Beeswax (grated or pellets)
3. Instructions
Melt Resin & Oil: Using a double boiler (or a glass jar set inside a pot of simmering water), combine the cleaned resin and oil. Heat gently over low heat until the resin is completely dissolved into the oil.
Add Beeswax: Once the resin is melted, add the beeswax to the mixture. Stir occasionally until melted.Pour and Cool: Pour the liquid mixture into small tins or glass jars.
Set: Let it cool completely at room temperature before putting lids on.
4. Tips for Success
Storage: Store in a cool, dark place. The salve can last for 1–2 years.
Consistency: For a softer salve, use less beeswax; for a harder balm, use more.
Cleanup: To clean tools, use olive oil or rubbing alcohol to remove the sticky residue.
Usage: Apply to minor wounds, dry skin, or as a chest rub for congestion.
This post is for educational purposes only and reflects traditional use and personal practice. It is not medical advice. Always patch test, use discretion, and consult a qualified professional first for health concerns. Do not use on deep wounds, serious infections, or if you have known sensitivities.
With Bliss xo

Featured Product

Handmade in Penticton,BC